|
http://formations.elcet.net
|
|||||||
|
A little Black Faery: an introductory tutorial to N-Sided Quidam
|
|||||||
| In this exercise, I shall led you to explore some of the most important functions of the Quidam character creation software. The two elements that we shall gather are a cute and gentle faery and a natural background photograph. As Quidam involves nudity, if you do'nt like it (but nudity is beautiful, and we were all born naked), close this page ! This tut can only be done correctly with the production version of Quidam, 1.07 or later, because with the Demo one you cannot save anything ; however if you have'nt the serial version, you can try some modifications and save the faery's render as a simple screenshot. The exercise is finished in Photoshop ; version 6 or later is perfect for that (certainly that Photoshop 5 can also be OK), but you can use Photoshop Elements 1 or later as well. Here I shall explain with Photoshop 6 screenshots, later versions especially CS2 show small differences but the way to follow remains strictly identical. | |||||||
 |
|||||||
| I start from the point of view that it's quite illogical to depict the faeries as all-White beings, some (and especially if they live in tropical areas) may be Black too ! Quidam is a marvelous application to create easily different people, however with an Earthian Homo sapiens pattern. So let we discover Eburnea, a cute Black faery ! When you've created the character, you can re-use it in very different situations. But with Quidam itself, you can only put the character in front of a photo background (and it's preferable to photo-mount the character with the background picture into Photoshop), alternatively you can export the virtual sculpture in another 3D program such as Carrara, Cinema 4D, Lightwave etc. with the right plugin (available at extra cost from Quidam's manufacturer, N-Sided). Doing so, you keep the original Quidam skeleton, with all its pose functions. Natively Quidam can export an Obj folder, but it's a « dead » model, i.e. without bones therefore without poseability. | |||||||
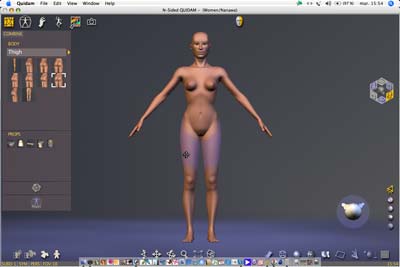
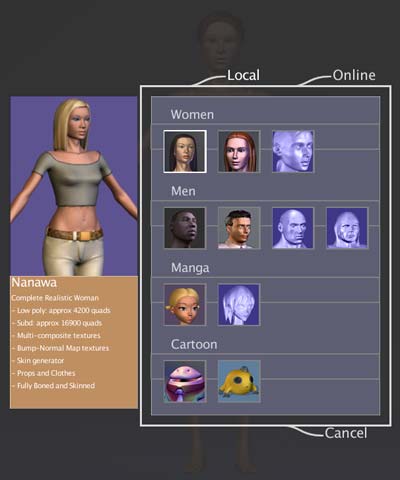 When starting Quidam, you are invited to choice between different characters. For Eburnea, let we select Nanawa, the realistic woman. If you've to close your saved document for a while, you've again to choice Nanawa to reopen the Eburnea file, then you make File > Open, you look for your saved document, you close the Nanawa window without saving it, otherwise you cannot open a saved document using Nanawa as basic woman model. The same is true if you have made a male model using Leon as base character, if you have made a manga girl starting from Sakura etc. When starting Quidam, you are invited to choice between different characters. For Eburnea, let we select Nanawa, the realistic woman. If you've to close your saved document for a while, you've again to choice Nanawa to reopen the Eburnea file, then you make File > Open, you look for your saved document, you close the Nanawa window without saving it, otherwise you cannot open a saved document using Nanawa as basic woman model. The same is true if you have made a male model using Leon as base character, if you have made a manga girl starting from Sakura etc. |
|||||||
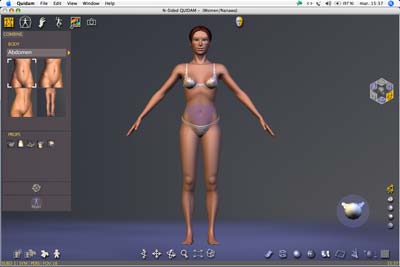 Nanawa appears in the default position, clothed with some tiny undergarments. She is a somewhat tall (perhaps 1.70 m) Eurasian woman. But you're already in the Combine workshop, the first of the six Quidam rooms. So selecting her various components by clicking on them (they shine in a violet colour), you're able to change some of her basic features. By default, her belly is selected and you have the choice of three kinds of abdomens, to which you access in the upper part of the big window on the left of your display. The lower part gives access to a very short choice of props in the 1.07 Quidam version. Nanawa appears in the default position, clothed with some tiny undergarments. She is a somewhat tall (perhaps 1.70 m) Eurasian woman. But you're already in the Combine workshop, the first of the six Quidam rooms. So selecting her various components by clicking on them (they shine in a violet colour), you're able to change some of her basic features. By default, her belly is selected and you have the choice of three kinds of abdomens, to which you access in the upper part of the big window on the left of your display. The lower part gives access to a very short choice of props in the 1.07 Quidam version. |
|||||||
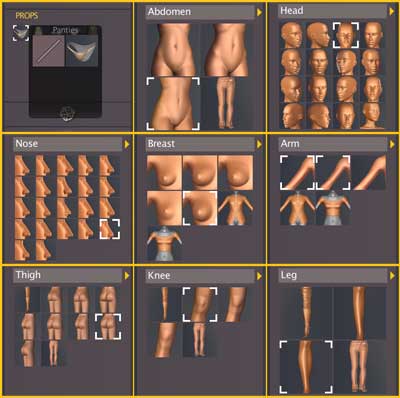 This picture gathers some of the various selections that have been done, one after another, in the Combine window of the Combine workshop to reach the basic pattern of Eburnea. Let us start with the window top left, showing the props. As we are painting a tropical faery, let us guess that she could live entirely naked, therefore no props are necessary. Eburnea is Black, but there are no adequate hair props for Black people in the 1.07 version, so I've depicted her with nearly no hair. We start with "no hair", let's wait for a while to add her some very short hair. Now turn to the Abdomen : I've taken the third one, it gives some stouter hips, which seems me preferable for this sportive and small magic woman, less than 1 metre tall (3 ft). For the Head, I've taken number 3, but perhaps you can make a better choice. For her Nose, if we want some broad and flat nose, let's begin with a not too pointed European one. Sure that the model, left of the last row, is tempting, but it gives a too big nose, which is not suitable for such a cute little faery. I've also selected thick lips (not shown here). For the Breast, I have made the choice at the centre because it gives small, somewhat pointed breasts, which is quite adapted for a Black woman. For the Arms, I've kept the default choice, and you can see that the two squares are by default selected. For the thighs, the choice indicated here gives robust and sportive legs. To this feature, you make a good choice with robust and well-sculptured Knees ; notice that the first icon goes with boots and the last one with trousers. Finally with the Legs, I've made the choice of more muscular ones, suited to Eburnea's sportive characteristics. This picture gathers some of the various selections that have been done, one after another, in the Combine window of the Combine workshop to reach the basic pattern of Eburnea. Let us start with the window top left, showing the props. As we are painting a tropical faery, let us guess that she could live entirely naked, therefore no props are necessary. Eburnea is Black, but there are no adequate hair props for Black people in the 1.07 version, so I've depicted her with nearly no hair. We start with "no hair", let's wait for a while to add her some very short hair. Now turn to the Abdomen : I've taken the third one, it gives some stouter hips, which seems me preferable for this sportive and small magic woman, less than 1 metre tall (3 ft). For the Head, I've taken number 3, but perhaps you can make a better choice. For her Nose, if we want some broad and flat nose, let's begin with a not too pointed European one. Sure that the model, left of the last row, is tempting, but it gives a too big nose, which is not suitable for such a cute little faery. I've also selected thick lips (not shown here). For the Breast, I have made the choice at the centre because it gives small, somewhat pointed breasts, which is quite adapted for a Black woman. For the Arms, I've kept the default choice, and you can see that the two squares are by default selected. For the thighs, the choice indicated here gives robust and sportive legs. To this feature, you make a good choice with robust and well-sculptured Knees ; notice that the first icon goes with boots and the last one with trousers. Finally with the Legs, I've made the choice of more muscular ones, suited to Eburnea's sportive characteristics. |
 When you've finished with the Combine workshop, you must obtain something like that. Now click on the icon of the next workshop, the Proportions one : this button is situated at the top left of the document's window, just right of the Combine one. It's represented by the Da Vinci man. When you've finished with the Combine workshop, you must obtain something like that. Now click on the icon of the next workshop, the Proportions one : this button is situated at the top left of the document's window, just right of the Combine one. It's represented by the Da Vinci man. |
||||||
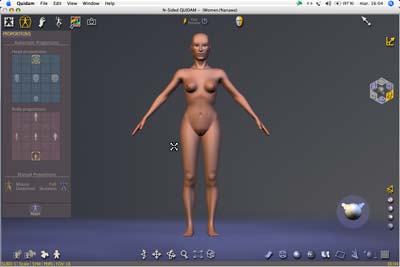 We shall spent very few minutes in the Proportions' room, just the time to give Eburnea a big head (main window, top) and short body proportions (main window, bottom). By default, the active field is at the center of each display. Clicking in a different square changes body proportions or size. Notice that if you're passing above a body segment, some sort of blue double-pyramid appears, which serves to change muscular appearance, massiveness etc., but here we shall'nt use them. We shall spent very few minutes in the Proportions' room, just the time to give Eburnea a big head (main window, top) and short body proportions (main window, bottom). By default, the active field is at the center of each display. Clicking in a different square changes body proportions or size. Notice that if you're passing above a body segment, some sort of blue double-pyramid appears, which serves to change muscular appearance, massiveness etc., but here we shall'nt use them. |
|||||||
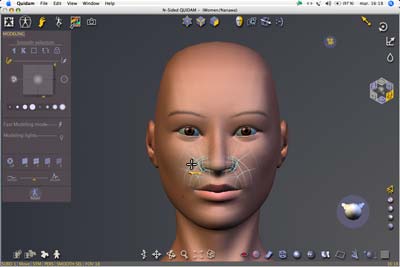 The longest part of this creation shall be spent in the Modeling (Sculpture) workshop. Here we shall transform the default Nanawa head into Eburnea, a true Black faery's head. This is done by means of « soft brushes », the diameter and hardness of which being adjusted at will in the window left. Then, with a simple drag of the mouse, you displace the polygons that are making the model. To led correctly this operation, you must enlarge the visible part of the future Eburnea with the Magnifier tool, the icon of which is situated alongside the bottom of the window, just in the middle. You just have to drag this icon with the pointer to change the magnification ratio. You have also to observe the model according to different orientations, using either the Orientation tool (left of the Magnifier icon) or the Change view palette, right of the document window. This is especially true to succeed with Eburnea's elf ears. By default, the changes are applied bilaterally, except if you click on the small grey-yellow head at the top of the document's window. If you do so, then the head icon becomes grey-blue, and the modifications apply to one side only : this is only desirable to add a final touch of assymetry to a face, and evidently also to pose the model. Here you see how to widen the nose to reach a realistic tropical nose pattern. The longest part of this creation shall be spent in the Modeling (Sculpture) workshop. Here we shall transform the default Nanawa head into Eburnea, a true Black faery's head. This is done by means of « soft brushes », the diameter and hardness of which being adjusted at will in the window left. Then, with a simple drag of the mouse, you displace the polygons that are making the model. To led correctly this operation, you must enlarge the visible part of the future Eburnea with the Magnifier tool, the icon of which is situated alongside the bottom of the window, just in the middle. You just have to drag this icon with the pointer to change the magnification ratio. You have also to observe the model according to different orientations, using either the Orientation tool (left of the Magnifier icon) or the Change view palette, right of the document window. This is especially true to succeed with Eburnea's elf ears. By default, the changes are applied bilaterally, except if you click on the small grey-yellow head at the top of the document's window. If you do so, then the head icon becomes grey-blue, and the modifications apply to one side only : this is only desirable to add a final touch of assymetry to a face, and evidently also to pose the model. Here you see how to widen the nose to reach a realistic tropical nose pattern. |
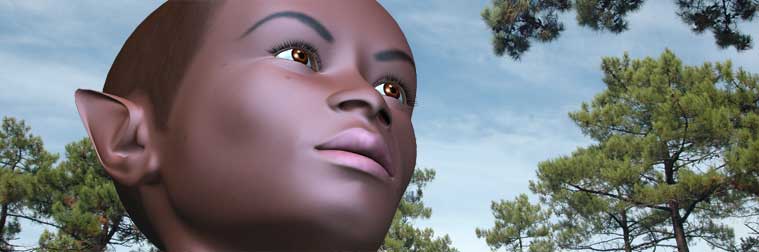
 It is difficult to explain in detail how to transform Nanawa into Eburnea if we start from a single orientation only. You must consider the face as a tridimensional volume and very often turn it to reach satisfactory results. The main differences in frontal view are the wider biparietal width of Eburnea (here depicted finished with a darker skin colour) and her squarer head. Notice also that her nose is shorter, resulting in a longer subnasal height : often tropical people who have wide noses also have shorter ones, therefore tall subnasal heigths. It is difficult to explain in detail how to transform Nanawa into Eburnea if we start from a single orientation only. You must consider the face as a tridimensional volume and very often turn it to reach satisfactory results. The main differences in frontal view are the wider biparietal width of Eburnea (here depicted finished with a darker skin colour) and her squarer head. Notice also that her nose is shorter, resulting in a longer subnasal height : often tropical people who have wide noses also have shorter ones, therefore tall subnasal heigths. |
||||||
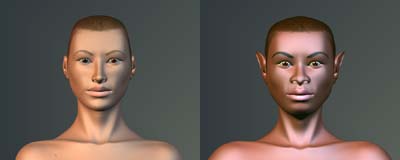
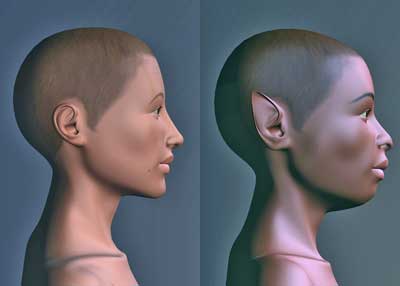 If the face differences between Nanawa and Eburnea are evident, the profile view ones are the key to success and building an interesting and original character ! Eburnea has a shorter and more rounded forehead (as a whole, the shape of her braincase vault is different), her face is somewhat prognathic because she has thicker lips, receding chin with a quite different appearance. This is quite easily done with Quidam's soft brushes, so in few minutes you reach marvelous results that it's nearly impossible to get with other 3D human character applications except very costy ones. Simply by tilting the ear rearwards and upwards and also laterally, you get these well known elf ears ! If the face differences between Nanawa and Eburnea are evident, the profile view ones are the key to success and building an interesting and original character ! Eburnea has a shorter and more rounded forehead (as a whole, the shape of her braincase vault is different), her face is somewhat prognathic because she has thicker lips, receding chin with a quite different appearance. This is quite easily done with Quidam's soft brushes, so in few minutes you reach marvelous results that it's nearly impossible to get with other 3D human character applications except very costy ones. Simply by tilting the ear rearwards and upwards and also laterally, you get these well known elf ears ! |
 The differences are evident in this 3/4 view. Notice that the malar bones (cheek bones) have been made more pointing outwards, which gives a more energetic appearance to this little magic woman, and emphazises the realism of the result. The differences are evident in this 3/4 view. Notice that the malar bones (cheek bones) have been made more pointing outwards, which gives a more energetic appearance to this little magic woman, and emphazises the realism of the result. |
||||||
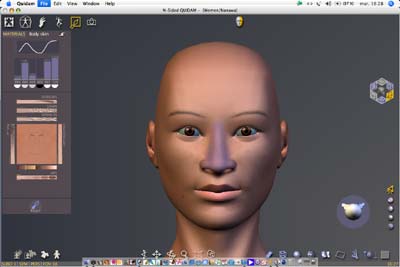 Let us turn now to the Materials workshop. Here you shall select the colour and texture of your model. The window on the left and the default Nanawa model are showing the default condition : a light, somewhat pinkish skin, minimum eyebrows, minimum grain and speckles, light lips. Hair also are kept to minimum, therefore this Nanawa model appears entirely bald. Let you also notice that the specular ratio of skin is minimum and is of white colour. Let us turn now to the Materials workshop. Here you shall select the colour and texture of your model. The window on the left and the default Nanawa model are showing the default condition : a light, somewhat pinkish skin, minimum eyebrows, minimum grain and speckles, light lips. Hair also are kept to minimum, therefore this Nanawa model appears entirely bald. Let you also notice that the specular ratio of skin is minimum and is of white colour. |
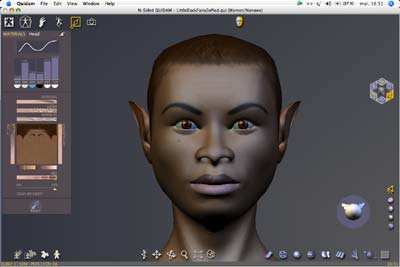 Now look at Eburnea and see how different is the result simply by dragging some cursors. If you redraw with the mouse the « Scratch » graph atop of the main window, you can emphazise the shining aspect of the Black skin and also give it a bluish reflexion colour : simply click on the half-circle underneath the graph, a colour selector appears on which you can make your choices. The only point that is not convincing in the final result is the poor resolution of the skin textures ; this point shall be corrected in future versions of Quidam, but it's only to be seen is big closeups such as this face view. Now look at Eburnea and see how different is the result simply by dragging some cursors. If you redraw with the mouse the « Scratch » graph atop of the main window, you can emphazise the shining aspect of the Black skin and also give it a bluish reflexion colour : simply click on the half-circle underneath the graph, a colour selector appears on which you can make your choices. The only point that is not convincing in the final result is the poor resolution of the skin textures ; this point shall be corrected in future versions of Quidam, but it's only to be seen is big closeups such as this face view. |
||||||
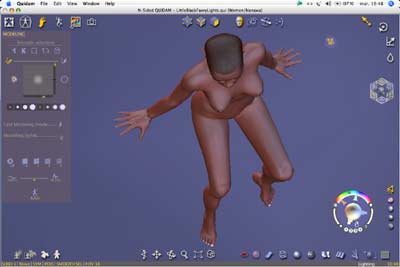
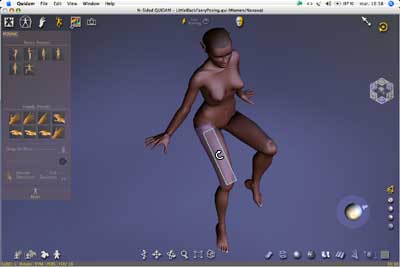 Save Eburnea in her default position as a Qui file if you want to reuse this character later, then go back to the Pose workshop. Here you can turn the various body segments which appear in blue when you fly over with the pointer. With a drag-and-drop you can place the segments in a good pose, but for that it's necessary to check that everything is OK according to all orientations, as said before. We are giving to Eburnea a sitting position on a natural support, easily suitable for a photographic background. Save Eburnea in her default position as a Qui file if you want to reuse this character later, then go back to the Pose workshop. Here you can turn the various body segments which appear in blue when you fly over with the pointer. With a drag-and-drop you can place the segments in a good pose, but for that it's necessary to check that everything is OK according to all orientations, as said before. We are giving to Eburnea a sitting position on a natural support, easily suitable for a photographic background. |
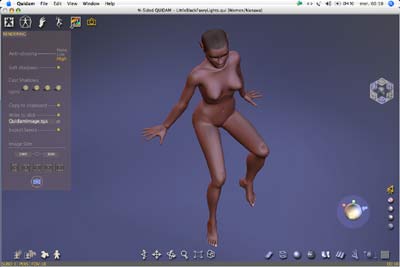
 You have to place the lights. Quidam allows four lights. This view shows how it's necessary to observe according to the different orientations the exact place of each of these four ones, because it's nearly impossible to turn the position of the light sources from one single point of view only. I have managed to get a not too much contrasted light so that it could be easily adapted to various backgrounds. Another important point : in the Modeling workshop, you can subdivide the default basic model (n° 1) by 4 (n° 2), this giving superior curves in the place of angular shapes. Even with less than 17,000 polygons (once subdivided by 4), this Quidam model gives results which are equivalent to characters having from 75,000 to 110,000 polys ! However, even if you can use the Drop tool to soften some edges, it does'nt give marvelous results. Finally, you have to render bump such as grain by clicking on the Bump button, which is the fourth at bottom right of the document's window. You have to place the lights. Quidam allows four lights. This view shows how it's necessary to observe according to the different orientations the exact place of each of these four ones, because it's nearly impossible to turn the position of the light sources from one single point of view only. I have managed to get a not too much contrasted light so that it could be easily adapted to various backgrounds. Another important point : in the Modeling workshop, you can subdivide the default basic model (n° 1) by 4 (n° 2), this giving superior curves in the place of angular shapes. Even with less than 17,000 polygons (once subdivided by 4), this Quidam model gives results which are equivalent to characters having from 75,000 to 110,000 polys ! However, even if you can use the Drop tool to soften some edges, it does'nt give marvelous results. Finally, you have to render bump such as grain by clicking on the Bump button, which is the fourth at bottom right of the document's window. |
||||||
 In the last workshop, the Rendering one, you have simply to adjust the final parameters. The 2D image is either exported in Targa (.tga) file format or as Jpg. Photoshop file format is'nt allowed for now, so take the Targa one and in Photoshop you shall convert the file to « .psd ». You have to choice the resolution, which has the document's window proportions, unless you click on the small yellow dot situated between the width and the height dimensions (in pixels) in the Image Size field of the adjustment window. It's also necessary to click on the options Write to disk and Export layers, otherwise you shall'nt get the Alpha channel which is necessary to make an easy selection of Eburnea in Photoshop. In the last workshop, the Rendering one, you have simply to adjust the final parameters. The 2D image is either exported in Targa (.tga) file format or as Jpg. Photoshop file format is'nt allowed for now, so take the Targa one and in Photoshop you shall convert the file to « .psd ». You have to choice the resolution, which has the document's window proportions, unless you click on the small yellow dot situated between the width and the height dimensions (in pixels) in the Image Size field of the adjustment window. It's also necessary to click on the options Write to disk and Export layers, otherwise you shall'nt get the Alpha channel which is necessary to make an easy selection of Eburnea in Photoshop. |
|||||||
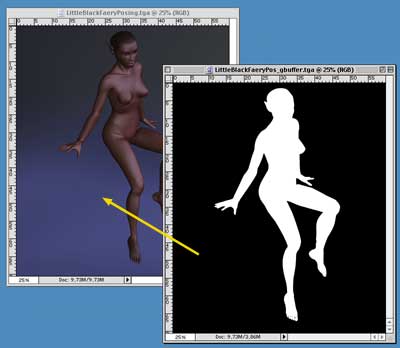 Finally, you have to deal with three separate files : QuidamImage.tga which is the render itself, QuidamImage_gbuffer.tga which is a separate image of the Alpha channel, and QuidamImage_zbuffer which is a description of the model in depth. The latter one we shall'nt use here. Open the render and the Alpha files with Photoshop, select the Displacement tool, and transfer the contents of the latter into the first one. Check that in the View menu, Snap to > Document bounds is selected : this shall attract the new Layer just in front to the default (i.e. Background Layer) one. Finally, you have to deal with three separate files : QuidamImage.tga which is the render itself, QuidamImage_gbuffer.tga which is a separate image of the Alpha channel, and QuidamImage_zbuffer which is a description of the model in depth. The latter one we shall'nt use here. Open the render and the Alpha files with Photoshop, select the Displacement tool, and transfer the contents of the latter into the first one. Check that in the View menu, Snap to > Document bounds is selected : this shall attract the new Layer just in front to the default (i.e. Background Layer) one. |
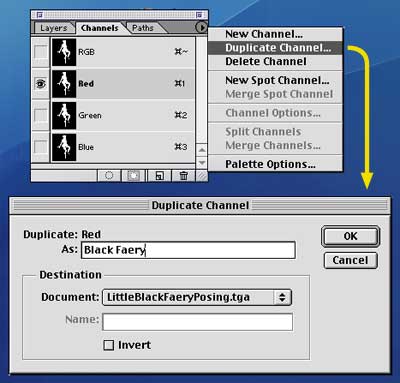 Then you use the selection potential of the Alpha file. For that, you can duplicate one of the RGB Channels of the new Layer which appears when you've pasted the Alpha image on the picture. A window appears (bottom of this figure). Rename the new Channel as "Eburnea", or Black Faery), after which you discard the above-lying Layer. Finally you save the file as ".psd" (do'nt forget in the Save window of Photoshop to keep the precious Alpha channel by clicking on the adequate button). Then you use the selection potential of the Alpha file. For that, you can duplicate one of the RGB Channels of the new Layer which appears when you've pasted the Alpha image on the picture. A window appears (bottom of this figure). Rename the new Channel as "Eburnea", or Black Faery), after which you discard the above-lying Layer. Finally you save the file as ".psd" (do'nt forget in the Save window of Photoshop to keep the precious Alpha channel by clicking on the adequate button). |
||||||
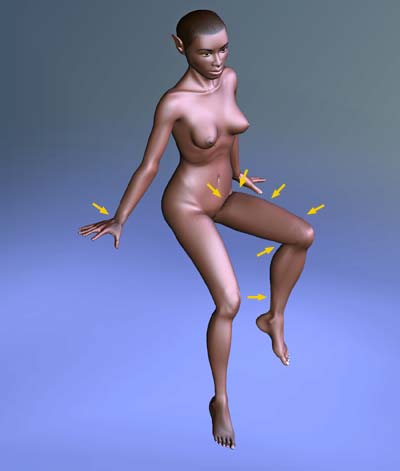 Hovever, as said earlier, even with the very good skinning quality of Quidam and using its Drop tool, some postwork remains necessary, and this is especially true when limbs (elbows, knees) are flexed at 80° or more. Even the thighs are'nt correctly curved, they show some angle at mid-length. Then you have to do some postwork into Photoshop, with the Clone Stamp tool, the Eraser and the Brush. The Filter Liquify (to which you access in Psd6 by Image > Liquify and in later versions by Filter > Liquify) may only help to correct some details, but you have to choice a big diameter of tool and very small pressure, otherwise you will have very crude results. On this pict, I've marked by yellow arrows the details that have already been redrawn. Hovever, as said earlier, even with the very good skinning quality of Quidam and using its Drop tool, some postwork remains necessary, and this is especially true when limbs (elbows, knees) are flexed at 80° or more. Even the thighs are'nt correctly curved, they show some angle at mid-length. Then you have to do some postwork into Photoshop, with the Clone Stamp tool, the Eraser and the Brush. The Filter Liquify (to which you access in Psd6 by Image > Liquify and in later versions by Filter > Liquify) may only help to correct some details, but you have to choice a big diameter of tool and very small pressure, otherwise you will have very crude results. On this pict, I've marked by yellow arrows the details that have already been redrawn. |
|||||||
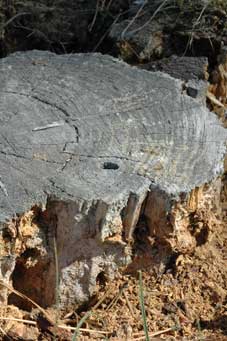 This is an old trunk on which we shall sit down gentle Eburnea. In fact the photograph was taken as Eburnea's pose was finished : either you have to pose a model according to a photograph you've taken earlier, or you take a photo that suits a peculiar pose of a model, anyway it's necessary that the two match correctly. The lights come from the right in Eburnea's render, so it's necessary to reverse the pict left-right in Photoshop's Image menu. This is an old trunk on which we shall sit down gentle Eburnea. In fact the photograph was taken as Eburnea's pose was finished : either you have to pose a model according to a photograph you've taken earlier, or you take a photo that suits a peculiar pose of a model, anyway it's necessary that the two match correctly. The lights come from the right in Eburnea's render, so it's necessary to reverse the pict left-right in Photoshop's Image menu. |
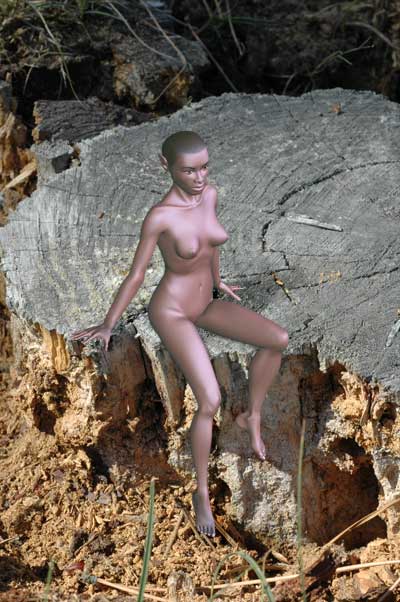 Select Eburnea from the modified render with the menu Select > Load selection that recalls the Alpha Channel. Apply Select >Modify > Contract. Take 1 pixel in the window that appears. Then apply Select > Modify > Smooth, and take also 1 pixel : this value is sufficient to greatly improve the quality of the final artwork, otherwise it would look like a child's cutting. Copy the contents of the selection and paste Eburnea onto the photo background, looking for the best place for her back, hands and legs to rest comfortably. Close the modified render without saving it. Select Eburnea from the modified render with the menu Select > Load selection that recalls the Alpha Channel. Apply Select >Modify > Contract. Take 1 pixel in the window that appears. Then apply Select > Modify > Smooth, and take also 1 pixel : this value is sufficient to greatly improve the quality of the final artwork, otherwise it would look like a child's cutting. Copy the contents of the selection and paste Eburnea onto the photo background, looking for the best place for her back, hands and legs to rest comfortably. Close the modified render without saving it. |
||||||
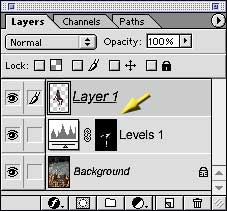 However, some adjustments are necessary to give quality results. First of all, normally, even a kind and lightweight faery such as Eburnea should cast some shadow. This is done with a Levels Adjustment Layer. Active the Background level, which contains the trunk of the dead tree. Make Layers > New adjustment layers > Levels, and in the window that appears, reduce the general brightness of the scene to get some dark render by tilting the Grey triangle to the left. Select the Layer Mask by clicking on its thumbnail ; notice that i) the Mask's icon is now surrounded by a double outline (partial double outline in PsdCS2 and later versions) and ii) now the colours have been reset to default i.e. full Black and full White in either the Toolbar or the Colour palette. However, some adjustments are necessary to give quality results. First of all, normally, even a kind and lightweight faery such as Eburnea should cast some shadow. This is done with a Levels Adjustment Layer. Active the Background level, which contains the trunk of the dead tree. Make Layers > New adjustment layers > Levels, and in the window that appears, reduce the general brightness of the scene to get some dark render by tilting the Grey triangle to the left. Select the Layer Mask by clicking on its thumbnail ; notice that i) the Mask's icon is now surrounded by a double outline (partial double outline in PsdCS2 and later versions) and ii) now the colours have been reset to default i.e. full Black and full White in either the Toolbar or the Colour palette. |
 Paint in Black with a soft brush everything in the scene that you do’nt want to be darkened. To help this operation, you can reduce the opacity of the Layer that contains Eburnea to see through what you’re doing underneath. If you make some mistake, it’s quite easy to return backwards by painting in white what you’ve covered with black. Doing so makes that only Eburnea’s shadow is darkened, the rest of the background image stays unchanged. I have’nt painted where the background image is already in shadow. Paint in Black with a soft brush everything in the scene that you do’nt want to be darkened. To help this operation, you can reduce the opacity of the Layer that contains Eburnea to see through what you’re doing underneath. If you make some mistake, it’s quite easy to return backwards by painting in white what you’ve covered with black. Doing so makes that only Eburnea’s shadow is darkened, the rest of the background image stays unchanged. I have’nt painted where the background image is already in shadow. |
||||||
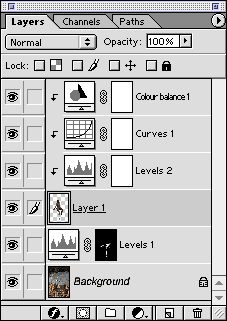 Another point is that maybe you have’nt correctly adjusted Eburnea’s lights when you made her render. So, you have to make specific Adjustment Layers for her, I mean Layers that do’nt affect underlying picture elements. Therefore, you have, either at the creation of the Layers by filling the button « Group with previous layers » (Psd 6 and 7) or « Create a clipping mask from the previous layer » (Psd CS and laters), shortcut Apple/Ctrl G, to ensure that result. Otherwise, what you do with Eburnea’s Layer shall affect also the background photograph. That's finished, folks! Another point is that maybe you have’nt correctly adjusted Eburnea’s lights when you made her render. So, you have to make specific Adjustment Layers for her, I mean Layers that do’nt affect underlying picture elements. Therefore, you have, either at the creation of the Layers by filling the button « Group with previous layers » (Psd 6 and 7) or « Create a clipping mask from the previous layer » (Psd CS and laters), shortcut Apple/Ctrl G, to ensure that result. Otherwise, what you do with Eburnea’s Layer shall affect also the background photograph. That's finished, folks! |
|||||||
|